This post describes about how to setup Samba server for file sharing with windows client. Samba is a freeware open source software suite that can be used for file sharing and print services. Using the SMB protocol we can share files across windows client.
So Let’s learn How to setup Samba server for file sharing with Windows client.
What we require for this demo:
- A Linux server with RHEL 6 Operating system
- A windows client
- Running “portmap/rpcbind” and “xinetd” services on linux server.
- Firewall should be off on server.
Step 1: Check if you have samba install on RHEL.
[root@rhel1 ~]# rpm -qa|grep samba
samba-winbind-clients-3.5.10-114.el6.x86_64
samba-common-3.5.10-114.el6.x86_64
samba-client-3.5.10-114.el6.x86_64
Now Install samba:
[root@rhel1 ~]# yum install samba
Recheck samba package after installation:
[root@rhel1 ]# rpm -qa|grep samba
samba-winbind-clients-3.5.10-114.el6.x86_64
samba-3.5.10-114.el6.x86_64
samba-common-3.5.10-114.el6.x86_64
samba-client-3.5.10-114.el6.x86_64
[root@rhel1 ]#
Step 2: Create a directory that you want to share to windows client.
[root@rhel1 ~]# mkdir /db_data
[root@rhel1 ~]#
Change folder permission.
[root@rhel1 ~]# chmod 777 /db_data
[root@rhel1 ~]#
Step 3: Now open “/etc/samba/smb.conf” file using vi,add/modify following lines of parameter. You can use same workgroup name of the windows client also.
workgroup = WORKGORUP
server string = Samba Server Version %v
Also add below entry for sharing “/db_data” mount point over network. Our task is to share data folder for “sambauser” user so go in the end of same file and do editing as shown below.
#For sharing /db_data
[dbdata]
comment = Uxtechno data
path = /db_data
public = no
writable = yes
printable = no
browsable = yes
write list= test
Save the file using :wq! command.
Step 4: create sambauser using useradd command. Set its password using below command.
[root@rhel1]# smbpasswd -a sambauser
New SMB password:
Retype new SMB password:
Added user sambauser.
Step 5: Restart samba service.
[root@rhel1 db_data]# service smb restart
Shutting down SMB services: [ OK ]
Starting SMB services: [ OK ]
[root@rhel1 db_data]#
Step 6: This step is only needed when your windows workgroup name is different from workgroup parameter in the step 3.
Login to Windows client and change workgroup to “WORKGORUP” as below:
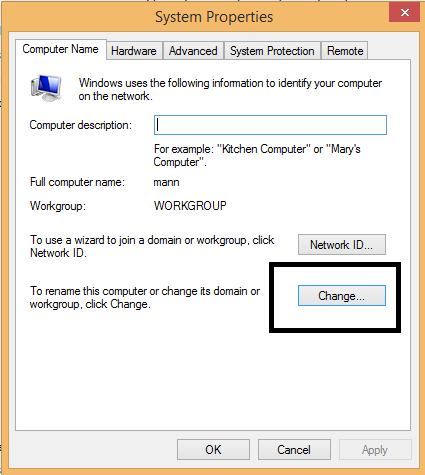
> Go to system properties and click on the change button.
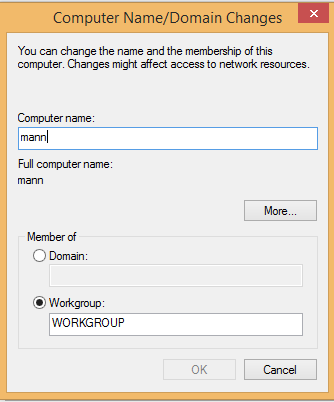
In the next windows set the workgroup name as “WORKGROUP” and click Ok.
Reboot your windows client after changing workgroup name.
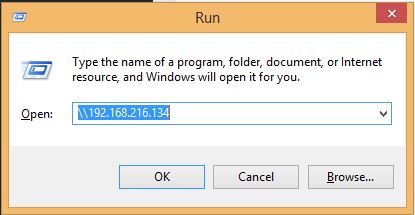
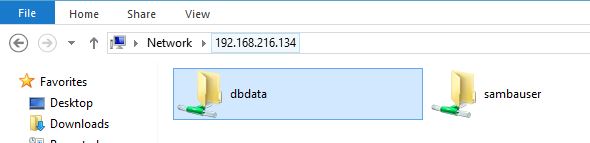
Step 7: Try to access “/db_data” shared by our samba server on the windows client using “\\192.168.216.134” command in run window as below and click Ok.
Kindly note that 192.168.216.134 is the ipaddress of the samba server.
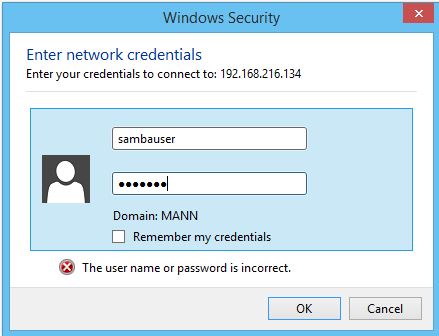
Window’s system will ask for username and password. Please enter username as “sambauser” and password set during the step 4.
And click Ok.
You can able to access the files shared by samba server as below:
You can also also check the status of access using below command on samba server using below command:
[root@rhel1 ~]# smbstatus

Samba version 3.5.10-114.el6
PID Username Group Machine
-------------------------------------------------------------------
4616 sambauser sambauser mann (::ffff:192.168.216.1)

Service pid machine Connected at
-------------------------------------------------------
dbdata 4616 mann Mon Jan 9 08:16:08 2017
IPC$ 4616 mann Mon Jan 9 08:14:19 2017

Locked files:
Pid Uid DenyMode Access R/W Oplock SharePath Name Time
--------------------------------------------------------------------------------------------------
4616 506 DENY_NONE 0x100081 RDONLY NONE /db_data . Mon Jan 9 08:16:08 2017

[root@rhel1 ~]#