Your Storage system has reached almost to the end of support and you want to migrate to newer technologies. Area of concern here is downtime and data-loss.Of course you can do this using backup and restore methodology or using pvmove. However, smart way for performing storage migration using lvconvert. This method does not involve downtime also it guarantees 100% against data-loss.
Demo scenario:
You have mount point “/uxtechno” which is being created using LVM. Now this mount point is created using “/dev/sdf1” which comes from old fashioned storage system and support of the same storage system is coming to an end. Now new disk /dev/sdg is allocated to system. And you want to migrate all the data from old disk to new disk without any data-loss and downtime. In this case, you can perform storage migration using lvconvert.
Details of the system.
1. Mount point
[root@rhel1 ~]# df -h /uxtechno
Filesystem Size Used Avail Use% Mounted on
/dev/mapper/vg_uxtechno-lv_uxtechno
194M 5.6M 179M 4% /uxtechno
[root@rhel1 ~]#
2. Check current underlying disk , volume group and lv details:
Volume group:
[root@rhel1 ~]# vgs
 VG #PV #LV #SN Attr VSize VFree
 myvg 2 2 0 wz--n- 2.99g 508.00m
 vg_rhel1 1 2 0 wz--n- 19.51g 0
 vg_uxtechno 1 1 0 wz--n- 1.19g 1020.00m
LV Details:
[root@rhel1 ~]# lvs
LV VG Attr LSize Origin Snap% Move Log Copy% Convert
etc_dup myvg -wi-a- 512.00m
lvol0 myvg -wi-a- 1.99g
lv_root vg_rhel1 -wi-ao 15.57g
lv_swap vg_rhel1 -wi-ao 3.94g
lv_uxtechno vg_uxtechno -wi-ao 200.00m
Currently resided file on the mount point
[root@rhel1 ~]# cd /uxtechno/
[root@rhel1 uxtechno]# ll
total 13
drwx------ 2 root root 12288 Jan 9 09:14 lost+found
-rw-r--r-- 1 root root 22 Jan 9 09:17 myfile.txt
[root@rhel1 uxtechno]# cat myfile.txt
I Love UXTechno!!!!!!
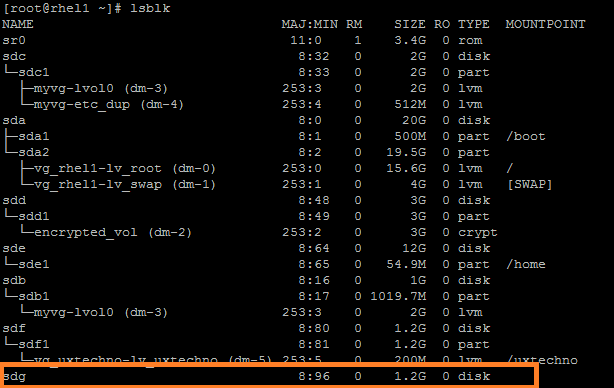
Step 1: Check for new disk , create new PV and add it current volume group.
In the above output /dev/sdg is the new disk coming from new storage system.
a. Create new partition using fdisk command.
b. Create new PV.
[root@rhel1 ~]# pvcreate /dev/sdg1
Writing physical volume data to disk "/dev/sdg1"
Physical volume "/dev/sdg1" successfully created
c. Add this new disk to current VG.
[root@rhel1 ~]# vgextend vg_uxtechno /dev/sdg1 -v
Checking for volume group "vg_uxtechno"
Archiving volume group "vg_uxtechno" metadata (seqno 6).
Wiping cache of LVM-capable devices
Adding physical volume '/dev/sdg1' to volume group 'vg_uxtechno'
Volume group "vg_uxtechno" will be extended by 1 new physical volumes
Creating volume group backup "/etc/lvm/backup/vg_uxtechno" (seqno 7).
Volume group "vg_uxtechno" successfully extended
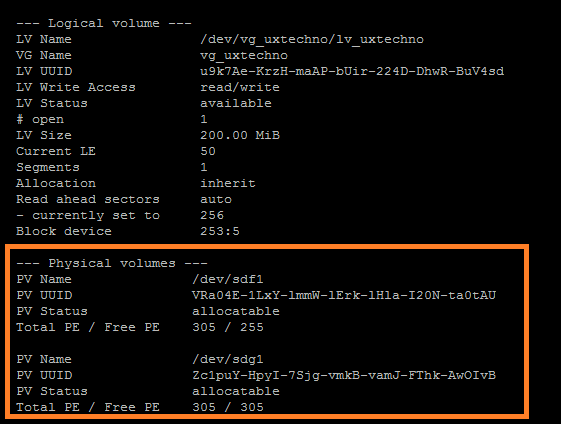
Now VG will have two PV’s as below, confirm it using vgdisplay -v vg_uxtechno command:
Step 2: Create Mirror
Now create mirror using lvconvert command which is main stage of performing storage migration using lvconvert.
[root@rhel1 ~]# lvconvert -m 1 --mirrorlog core /dev/vg_uxtechno/lv_uxtechno /dev/sdg1
vg_uxtechno/lv_uxtechno: Converted: 20.0%
vg_uxtechno/lv_uxtechno: Converted: 100.0%
In the above command -m 1 creates single mirror and –mirrorlog core specifies log be kept in memory which eliminates the need for an extra log device.
Step 3: Once migration is completed check the status of mirror.
[root@rhel1 ~]# lvs -o +devices
LV VG Attr LSize Origin Snap% Move Log Copy% Convert Devices
etc_dup myvg -wi-a- 512.00m /dev/sdc1(256)
lvol0 myvg -wi-a- 1.99g /dev/sdb1(0)
lvol0 myvg -wi-a- 1.99g /dev/sdc1(0)
lv_root vg_rhel1 -wi-ao 15.57g /dev/sda2(0)
lv_swap vg_rhel1 -wi-ao 3.94g /dev/sda2(3986)
lv_uxtechno vg_uxtechno mwi-ao 200.00m 100.00 lv_uxtechno_mimage_0(0),lv_uxtechno_mimage_1(0)
In the above output 100% data is mirrored.
Step 4: Remove mirror.
Once you are sure about that everything is Ok. You can remove mirror. Which is almost final stage of storage migration using lvconvert.
[root@rhel1 ~]# lvconvert -m 0 /dev/vg_uxtechno/lv_uxtechno /dev/sdf1
Logical volume lv_uxtechno converted.
LV level Check.
[root@rhel1 ~]# lvs -o +devices
LV VG Attr LSize Origin Snap% Move Log Copy% Convert Devices
etc_dup myvg -wi-a- 512.00m /dev/sdc1(256)
lvol0 myvg -wi-a- 1.99g /dev/sdb1(0)
lvol0 myvg -wi-a- 1.99g /dev/sdc1(0)
lv_root vg_rhel1 -wi-ao 15.57g /dev/sda2(0)
lv_swap vg_rhel1 -wi-ao 3.94g /dev/sda2(3986)
lv_uxtechno vg_uxtechno -wi-ao 200.00m /dev/sdg1(0)
Check the files under /uxtechno.
[root@rhel1 ~]# cd /uxtechno/
[root@rhel1 uxtechno]# ll
total 13
drwx------ 2 root root 12288 Jan 9 09:14 lost+found
-rw-r--r-- 1 root root 22 Jan 9 09:17 myfile.txt
[root@rhel1 uxtechno]# cat myfile.txt
I Love UXTechno!!!!!!
In the above output newer disk device is shown in lvs output and also our files under mount point are intact which confirms that we have successfully done storage migration using lvconvert.
Step 5: Now everything is done It’s time to remove our old disk from the volume group.
[root@rhel1]# vgreduce vg_uxtechno /dev/sdf1
Removed "/dev/sdf1" from volume group "vg_uxtechno"