For Setting up WordPress on amazon aws EC2 following pre-requisite need to met:
AWS Account: First of all you need to have aws account for Setting up WordPress on amazon aws EC2. For signing an account ,You can sign up here. Amazon needs credit card and phone number details for initial signup. Amazon provides free tier account with which you can practice things for one year obvious keeping some limitations for use.You can check all the details here.
Note: You can watch all steps in my video blog here.
Step 1:
Create an EC2 instance : In order to create a new instance, access the AWS Management Console and click the EC2 tab. Please select following options while creating EC2 instance:
- Choose an AMI in the classic instance wizard: I chose the Amazon Linux AMI 2016.09.1 (HVM), SSD Volume Type .
- Instance details: t2.micro
- Please do not forget to Create a new key pair. Give name for your key and download it on your computer with .pem extension.
- Select the quick start security group.
- Now Launch your instance.
Step 2:
Login to instance:
To login to instance you need to have the address of the instance to connect with instance. Please select instance in management console and check the public DNS in the instance description as below:
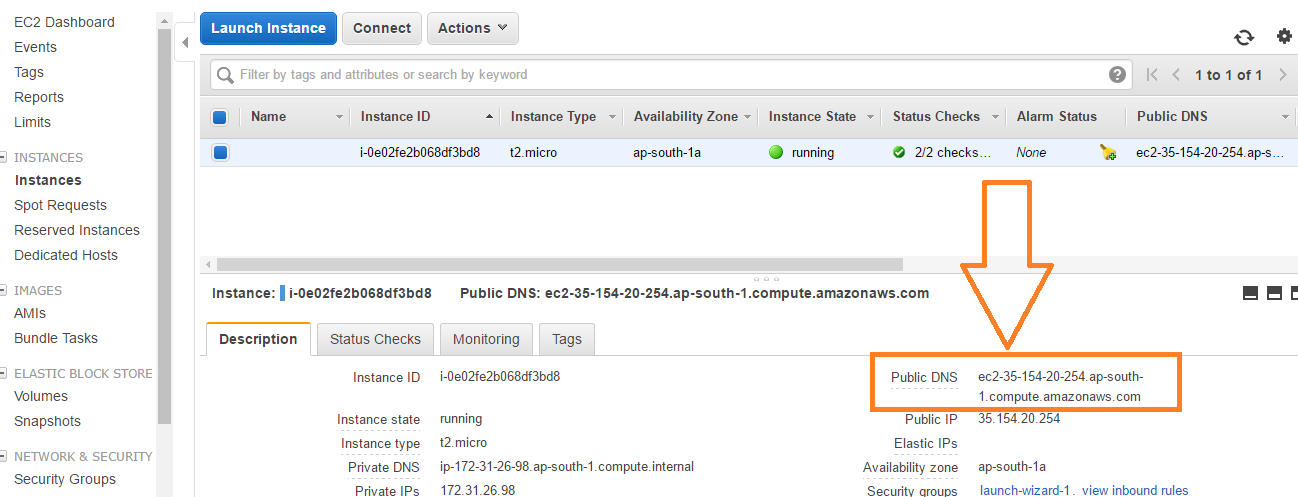
In the step number 1c we have created key pair and downloaded the key with .pem file for our instance.
Please check here how we can login to instance using putty using ec2-user login. Make sure you use below command after login.
sudo su -
Step 3: Install Apache server (web server)
For installing Apache server use below command:
yum install httpd
Start the Apache server.
[ec2-user@ip-172-31-26-98 ~]$service httpd start
Starting httpd: [ OK ]
Now cross check the apache server is running using below step:
Open browser and access your web site http://ec2-35-154-20-254.ap-south-1.compute.amazonaws.com using dns address captured in step 2. (make sure that you have opened port 80 in service group for this instance).You should see a standard AWS place holder page.
Step 4: Install PHP
For installing PHP give below command:
yum install php php-mysql
Step 5: Install MySQL
For installing mysql give below command:
yum install mysql-server
Now start the mysql service using below command:
service mysqld start
Now create Database myblog using below command:
mysqladmin -uroot create myblog
Now you have to secure your db using below command:
mysql_secure_Installation
Answer the above wizard questions as below:
- Enter current password for root: Press return for none
- Change Root Password: Y
- New Password: Enter your new password
- Remove anonymous user: Y
- Disallow root login remotely: Y
- Remove test database and access to it: Y
- Reload privilege tables now: Y
Step 6: Installing wordpress on EC2.
For installing wordpress use below set of commands:
cd /var/www/html
wget http://wordpress.org/latest.tar.gz
tar -xzvf latest.tar.gzcd
You will see one directory with name “wordpress” rename it with myblog using below command:
mv wordpress myblog
Create and update wp-config.php file:
cd myblog
mv wp-config-sample.php wp-config.php
vi wp-config.php
- Type i to start insert mode.
- Modify the database connection parameters as follows:
define(‘DB_NAME’, ‘myblog’);
define(‘DB_USER’, ‘root’);
define(‘DB_PASSWORD’, ‘YOUR_PASSWORD<which is set by you in step 5>’);
define(‘DB_HOST’, ‘localhost’); - Then type :wq to write the file and quit vi
Now Open a Browser and access your blog: http://ec2-35-154-20-254.ap-south-1.compute.amazonaws.com/myblog (Use your actual public DNS name). This will display the WordPress configuration process page.