osTicket is a widely-used and trusted open source support ticket system. It seamlessly routes inquiries created via email, web-forms and phone calls into a simple, easy-to-use, multi-user, web-based customer support platform. The best part is, it’s completely free. This Guide will quickly guide you on how to install Open Source support ticketing system OsTicket On Linux.
What do you need to install Open Source support ticketing system OsTicket on Linux
- RHEL 6 OS: For demo we have used RHEL6 OS.
[root@rhel1 ~]# cat /etc/redhat-release
Red Hat Enterprise Linux Server release 6.5 (Santiago)
[root@rhel1 ~]#
- httpd.
- mysql.
- php.
- OsTicket
Steps needed to install Open Source support ticketing system OsTicket
1. Install httpd
[root@rhel1 ~]# yum -y install httpd httpd-devel
2. Restart Apache Server
In the next step we need to restart the apache server and add apache service in chkconfig so that it will be get started up after reboot automatically.
[root@rhel1 ~]# service httpd restart
Stopping httpd:                                            [  OK  ]
Starting httpd:                                            [  OK  ]
[root@rhel1 ~]#  chkconfig httpd on
[root@rhel1 ~]#
3.Install and Configure MySQL
In the next step we need to install MySQL 0n the server.
[root@rhel1 ~]# yum -y install mysql mysql-server mysql-devel
4. Start Mysqld Service :
In this step we need to start the MySQL service also add MySQL service in chkconfig so that it will be get started up after reboot automatically.
[root@rhel1 ~]# service mysqld restart
[root@rhel1 ~]# chkconfig mysqld on
5.Changing MySQL Root Password :
Once we have started to MySQL service we need to change the MySQL root password.
[root@rhel1 ~]# mysql_secure_installation
Please enter following answers to question during setup:
Enter current password for root (enter for none): (Please Press enter for setting the root password)
Enter current password for root (enter for none):
OK, successfully used password, moving on...

Setting the root password ensures that nobody can log into the MySQL
root user without the proper authorisation.

Set root password? [Y/n] Y
New password:
Re-enter new password:
Remove anonymous users? [Y/n] Y
Disallow root login remotely? [Y/n] Y
Remove test database and access to it? [Y/n] Y
Reload privilege tables now? [Y/n] Y
6. Create Database required for OsTicket
Now we will be creating database required for OsTicket.
[root@rhel1 ~]# mysql -u root -p
You will get mysql prompt once you successfully authenticated. Please use below command for database creation.
mysql> create database osticket;
mysql> grant all privileges on osticket.* to osticket@'localhost' identified by 'password';
mysql>  flush privileges;
mysql> exit
[root@rhel1 ~]#
In the next step we will be installing PHP.
7. Install PHP.
[root@rhel1 ~]# yum -y install php php-mysql php-common php-gd php-mbstring php-mcrypt php-devel php-xml php-imap php-ldap php-mbstring php-odbc php-pear php-xmlrpc php-soap mod_ssl
8. Restart Apache server.
[root@rhel1 ~]# service httpd restart
Stopping httpd:                                            [  OK  ]
Starting httpd:                                            [  OK  ]
[root@rhel1 ~]#
9. Install & Configure OsTicket application :
[root@rhel1 ~]# yum -y install unzip
[root@rhel1 ~]# cd /var/www/html
[root@rhel1 html]# wget http://osticket.com/sites/default/files/download/osTicket-v1.9.2.zip
[root@rhel1 html]# unzip osTicket-v1.9.2.zip
[root@rhel1 html]#  mv upload support
10. Rename and change Permission of ost-sampleconfig.php file.
[root@rhel1 html]# cd /var/www/html/support/include
[root@rhel1 include]# mv ost-sampleconfig.php ost-config.php
[root@rhel1 include]# chmod 777 ost-config.php
11. Change in /etc/php.ini for the parameter short_open_tag
Open the file “/etc/php.ini”change “short_open_tag ” parameter to below one.
short_open_tag = On
12. Now Restart the apache One more time.
[root@rhel1 include]# service httpd restart
Stopping httpd:                                            [  OK  ]
Starting httpd:                                            [  OK  ]
[root@rhel1 include]#
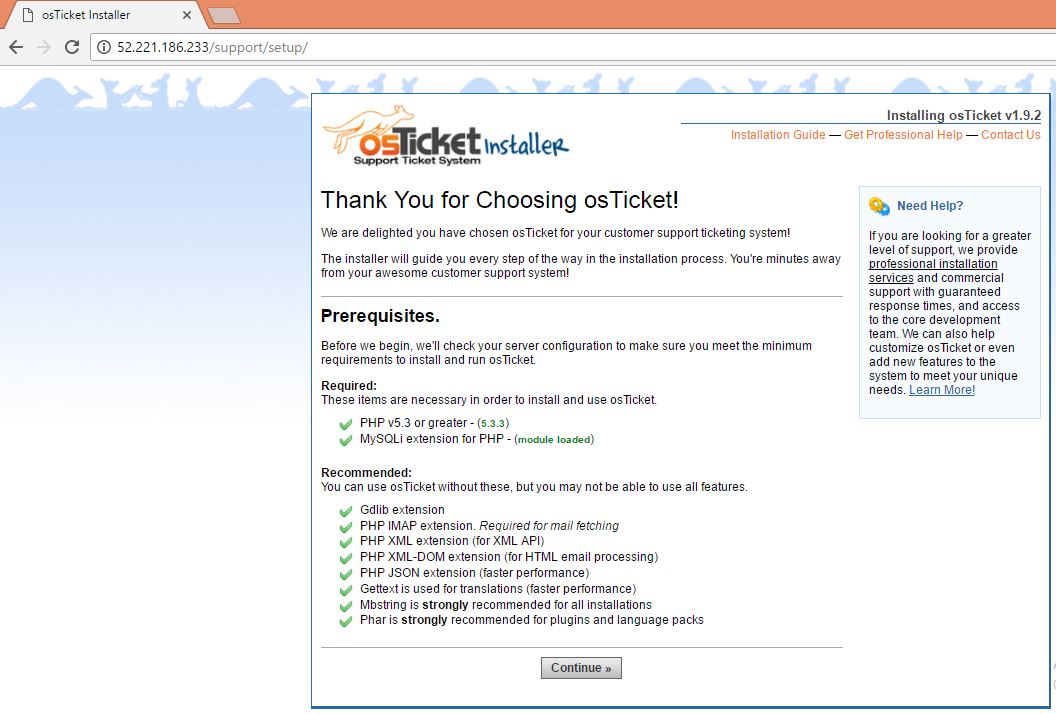
13. Now Open Browser and use below format in the address bar.
http://ip address/support/setup/
or
http://hostname or doamain/support/setup/
You will get below page in browser for further setup:
Click on Continue Button at the bottom. In the next window Enter below details and click install now button:
-->System Settings :
   Helpdesk Name: LinuxRoutes HelpDesk
   Default Email: admin@domain.com
   Default Language: English

--> Admin User :
   First Name: Manmohan
   Last Name : Mirkar
   Email Add : admin@domain.com
   Username  : administrator
   Password  : Password
   Retype Pass : Password

--> Database Settings :
   MySQL Hostname : localhost
   MySQL Database : osticket
   MySQL Username : osticket
   MySQL password : password
Screenshot to install Open Source support ticketing system OsTicket:
If all details are correct you will get success window along with URL for accessing OsTicket application as below:
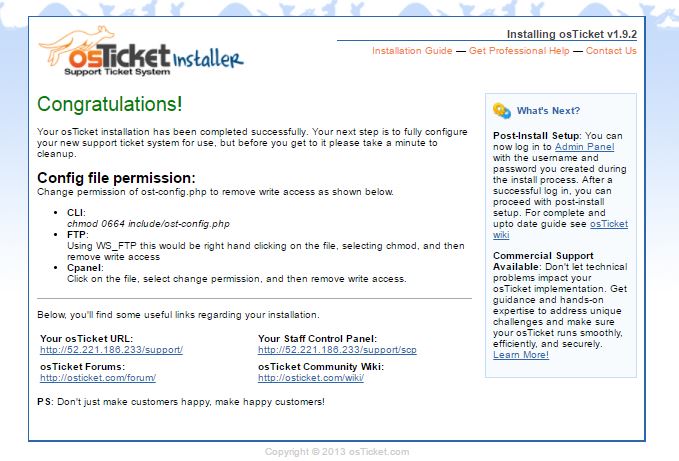
Now next time onward use address (Your osTicket URL) given in the above screenshot. So now onwards you can create new users using admin credentials and tickets can be created with normal user using URL given in the above screenshot “http://<IP address>/support/”
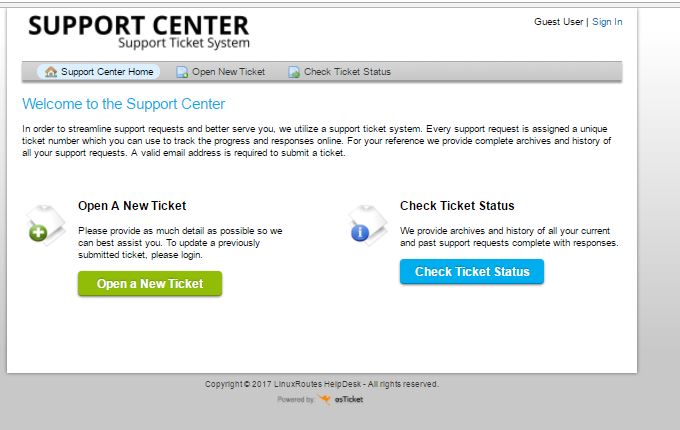
14. Change permission of “ost-config.php” and delete setup directory.
[root@rhel1 include]#  cd /var/www/html/support
[root@rhel1 support]# rm -rf setup
[root@rhel1 support]# chmod 644 /var/www/html/support/include/ost-config.php
Reference: